
Hurdlr already helps you have time and money by automating your expense tracking, but Expense Rules help you take that one step further. Expense Rules help you further automate your expense tracking by automatically tagging transactions as they pull in from your linked accounts. This removes the need for you to tag those transactions manually, saving you time and ensuring all of your deductions are captured.
You can create expense rules manually or by approving AI suggested expense rules.
Creating Expense Rules Manually
You can manually create expense rules at any time. There are 2 ways that you can manually create expense rules: while tagging transactions or from the Vendors section.
To Create a Rule while Tagging a Transaction
On the Mobile App
On the Mobile App
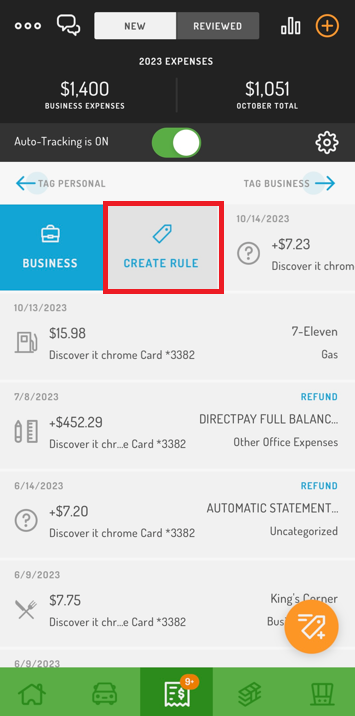
Navigate to the Expenses tab
By default, you’ll be in the ‘New’ section, which lists your untagged expenses
Gently swipe as if you were going to tag the expenses as Business or Personal
Select ‘Create a Rule’
Choose the expense category that you want transactions from that vendor to be tagged to
If tracking multiple businesses, pick which business you want transactions from that vendor to be associated with
If applicable, tag which client (if any) you want transactions from that vendor to be associated with
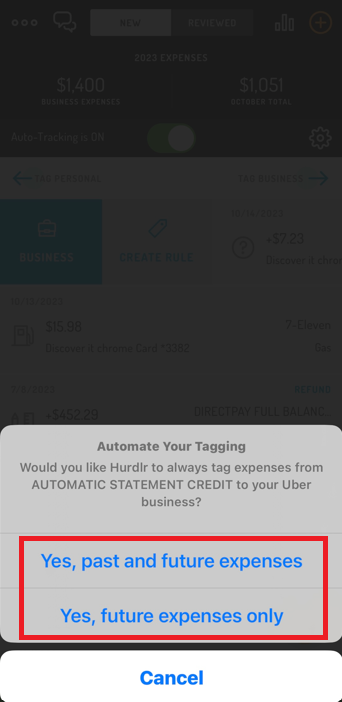
Choose if you’d like to automate those options for all transactions from that vendor (past and future) or only future
On the Web App
On the Web App
Navigate to the Expense Dashboard (Premium) or Transactions Dashboard > Money Out (Pro)
Click on an expense
Click the ‘Create a Rule’ button
Choose the expense category that you want transactions from that vendor to be tagged to
If tracking multiple businesses, pick which business you want transactions from that vendor to be associated with
If applicable, tag which client (if any) you want these transactions to be associated with
Select the specific Vendor for the rule or choose ‘No Vendor’
With ‘No Vendor’ selected, transactions that have a description matching the rule will use the transaction’s existing Vendor
If a particular vendor is selected, transactions that have a description matching the rule will be updated to use the Vendor indicated by the rule
Choose if you’d like to automate those options for all transactions from that vendor (past and future) or only future
Click ‘Save’
If this rule matches a rule that is archived, then a prompt will show either asking you to ‘Restore Archived’ or Restore and Update’ so that you do not have duplicate rules
If you are creating a rule similar to an active rule, then a prompt will ask you to edit the rule so it matches the already active rule or ‘Update the Existing Rule’
Create a Rule for a Particular Vendor
On the mobile app tap the gear icon on the Expenses tab or on the web app, click the gear icon in the top right corner
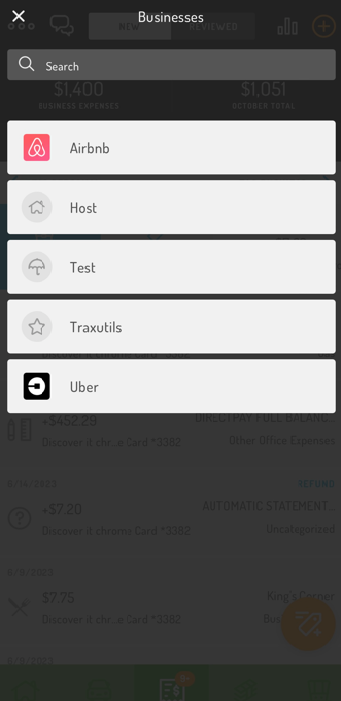
Select ‘Vendors’
Choose the vendor you want to set a rule for
Click ‘Create Rule’
Select to tag these set transactions as Business or Personal
If tracking multiple businesses, pick which business you want these transactions to be associated with
If applicable, tag which client (if any) you want transactions from that vendor to be associated with
Select the expense category you’d like transactions from that vendor tagged to
Select a Vendor or choose ‘No Vendor’
With ‘No Vendor’ selected, transactions that have a description the rule will use the transaction’s existing Vendor
If a particular vendor is selected, transactions that have a description matching the rule will be updated to use the Vendor indicated by the rule
Choose if you’d like to automate those options for all transactions from that vendor (past and future) or only future
Click ‘Save’
Create Rules for Expenses with Custom Data
If you have transactions that have transaction/date specific data (ie. dates, account info, etc), you can use the Advanced Rules feature to create a rule for a non-exact match. To do this:
On the mobile app, go to the Expenses tab and create a rule or on the web app click on the transaction to ‘Create a Rule’
Edit the transaction name to remove the transaction-specific data
Tap ‘Advanced Rules’
Turn ON the option to apply the rule to non-exact matches
This will apply the rule to any expense that includes the transaction name, even if the expense also includes transaction-specific data
AI Suggested Expense Rules
Suggested expense rules are AI-based suggestions meant to help you put your finances on auto-pilot by having Hurdlr automatically tag your expenses for you. Based on your tagging habits, Hurdlr will suggest rules that you can view, edit, and accept or reject.
When you have a rule suggestion, you’ll see a blue ‘Suggested Rules’ banner on the Expenses Dashboard (Premium) or Transactions Dashboard > Money Out (Pro). If you tap on it, it will show you the list of rules being suggested for you to approve or reject.
To set up a rule, simply tap the ‘Approve’ button. If you want to make edits to the rule before approving it, you can do that by tapping on the rule, making your edits, then tapping ‘Approve Rule’ at the bottom. When you approve a rule, you’ll have the option to apply to only future expenses or to both past and future expenses.
If you have expenses where the vendor name differs slightly due to transaction/date specific data, you can use the advanced rules features to apply your rules to non-exact matches.
View, Edit, and Delete Expense Rules
To view, edit, and delete Expense rules you’ve created:
In the mobile app, tap the gear icon in the Expense tab or in the web app click the gear icon in the top right corner and select ‘Expense Rules’
To edit, you can tap on any of the rules, make your changes, and save them
To delete, tap on any of the rules and click on ‘Delete Rule’ at the bottom
Restore a Deleted Expense Rule
If you delete an expense rule, you won’t be able to create a new rule for that vendor. Instead, you will instead need to restore the original expense rule. To do so:
In the mobile app, tap the gear icon in the Expense tab or in the web app click the gear icon in the top right corner and select ‘Expense Rules’
Click on the 3 horizontal lines icon in the top right corner and select ‘Archived’
Select the rule you wish to restore
Click ‘Restore’ at the bottom