Accurately tracking income and expenses for your business is essential when it comes to managing your finances and taxes. Hurdlr allows you to manage your income and expenses in a few different ways, allowing you to easily organize all transactions as either Business or Personal.
Hurdlr has three primary finance tracking options:
Automatic Finance Tracking (only available with a Premium or Pro subscription)
Tracking Finances via CSV Import (only available with a Premium or Pro subscription)
Manual Finance Tracking
Automatic Finance Tracking
Automatic Finance Tracking
The automatic finance tracking feature allows you to link your bank accounts and credit cards, automating your income and expense tracking. Once this data pulls into Hurdlr, you are able to tag each transaction as Business or Personal.
To link your bank account or credit card in Hurdlr, follow the steps here.
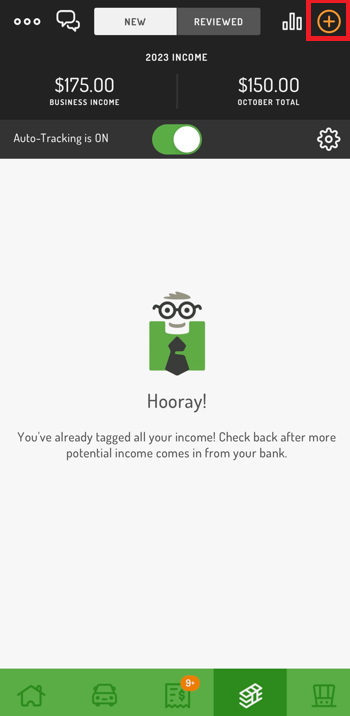
On the mobile app, transactions will pull into the ‘New’ section of the Expenses/Income tabs for you to tag as Business or Personal. To tag them, simply swipe left/right or use the Speed Tagging feature to tag multiple transactions at once.
On the web app, your untagged transactions will be listed at the top of your Expenses/Income Dashboard (Premium) or Transactions Dashboard (Pro) for you to tag by selecting the ‘Business’ or ‘Personal’ button or using the Speed Tagging feature.
Once tagged, your data will be listed in the ‘Reviewed’ section of the Expenses or Income tab in the mobile app or alongside the other tagged transactions in the web app and reflected in your totals and reports.
Tracking Finances via CSV Import
Tracking Finances via CSV Import
If your bank is unsupported or you want to pull in transactions dating further back than your bank allows, you are able to import your transactions via a CSV file. When you import a file, it adds all of your transactions to the Income/Expenses Dashboards (Premium) or Transactions Dashboard (Pro) for you to tag as Business or Personal.
To import a CSV file of your transactions, follow the steps here.
Once imported, you can tag your transactions the same way you would tag transactions tracked via automatic finance tracking.
For transactions that you import from a CSV file or enter manually, you can specify the bank account or credit card by adding that account as a Manually Tracked Account.
Manual Finance Tracking
Manual Finance Tracking
If your bank is unsupported or you want to track transactions dating further back and you’d prefer to manually enter your transactions, this option is available to stay on top of your finances.
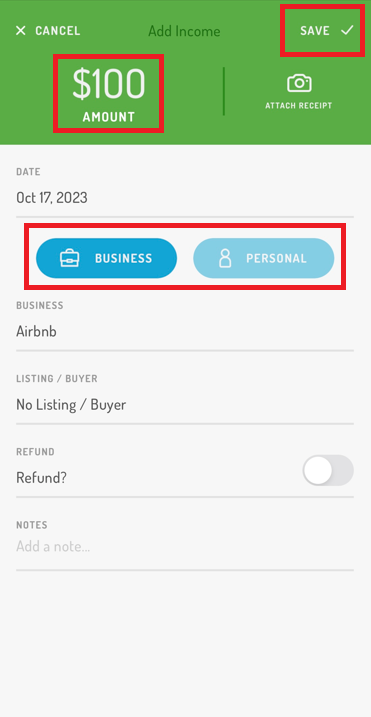
To manually add transactions:
Navigate to the Income or Expenses tab
Select the ‘+’ sign in top right corner
Fill out your required details for the transaction (i.e. date, amount, vendor, etc)
Tag as ‘Business’ or ‘Personal’
Click ‘Save’